Set up your Support Bot
Easily set up the SCNX Support Bot to offer a professional support experience on your Discord server. Setup takes just a few minutes.
Included in these plans
0. Pre-Flight Checklist
Before you get started, make sure that
- you have added your server to SCNX.
- your server has an active paid SCNX plan (Unlimited or Professional). The Support Bot is not available on the free Starter plan.
- you are the owner, a trusted admin with the Co-Owner permission, or an administrator of the server you want to enable this feature on.
- you've got a few minutes. Our estimate is that setup takes around two to three minutes on a computer — on mobile it may take a bit longer. Don't stop in the middle; your progress won't be saved.
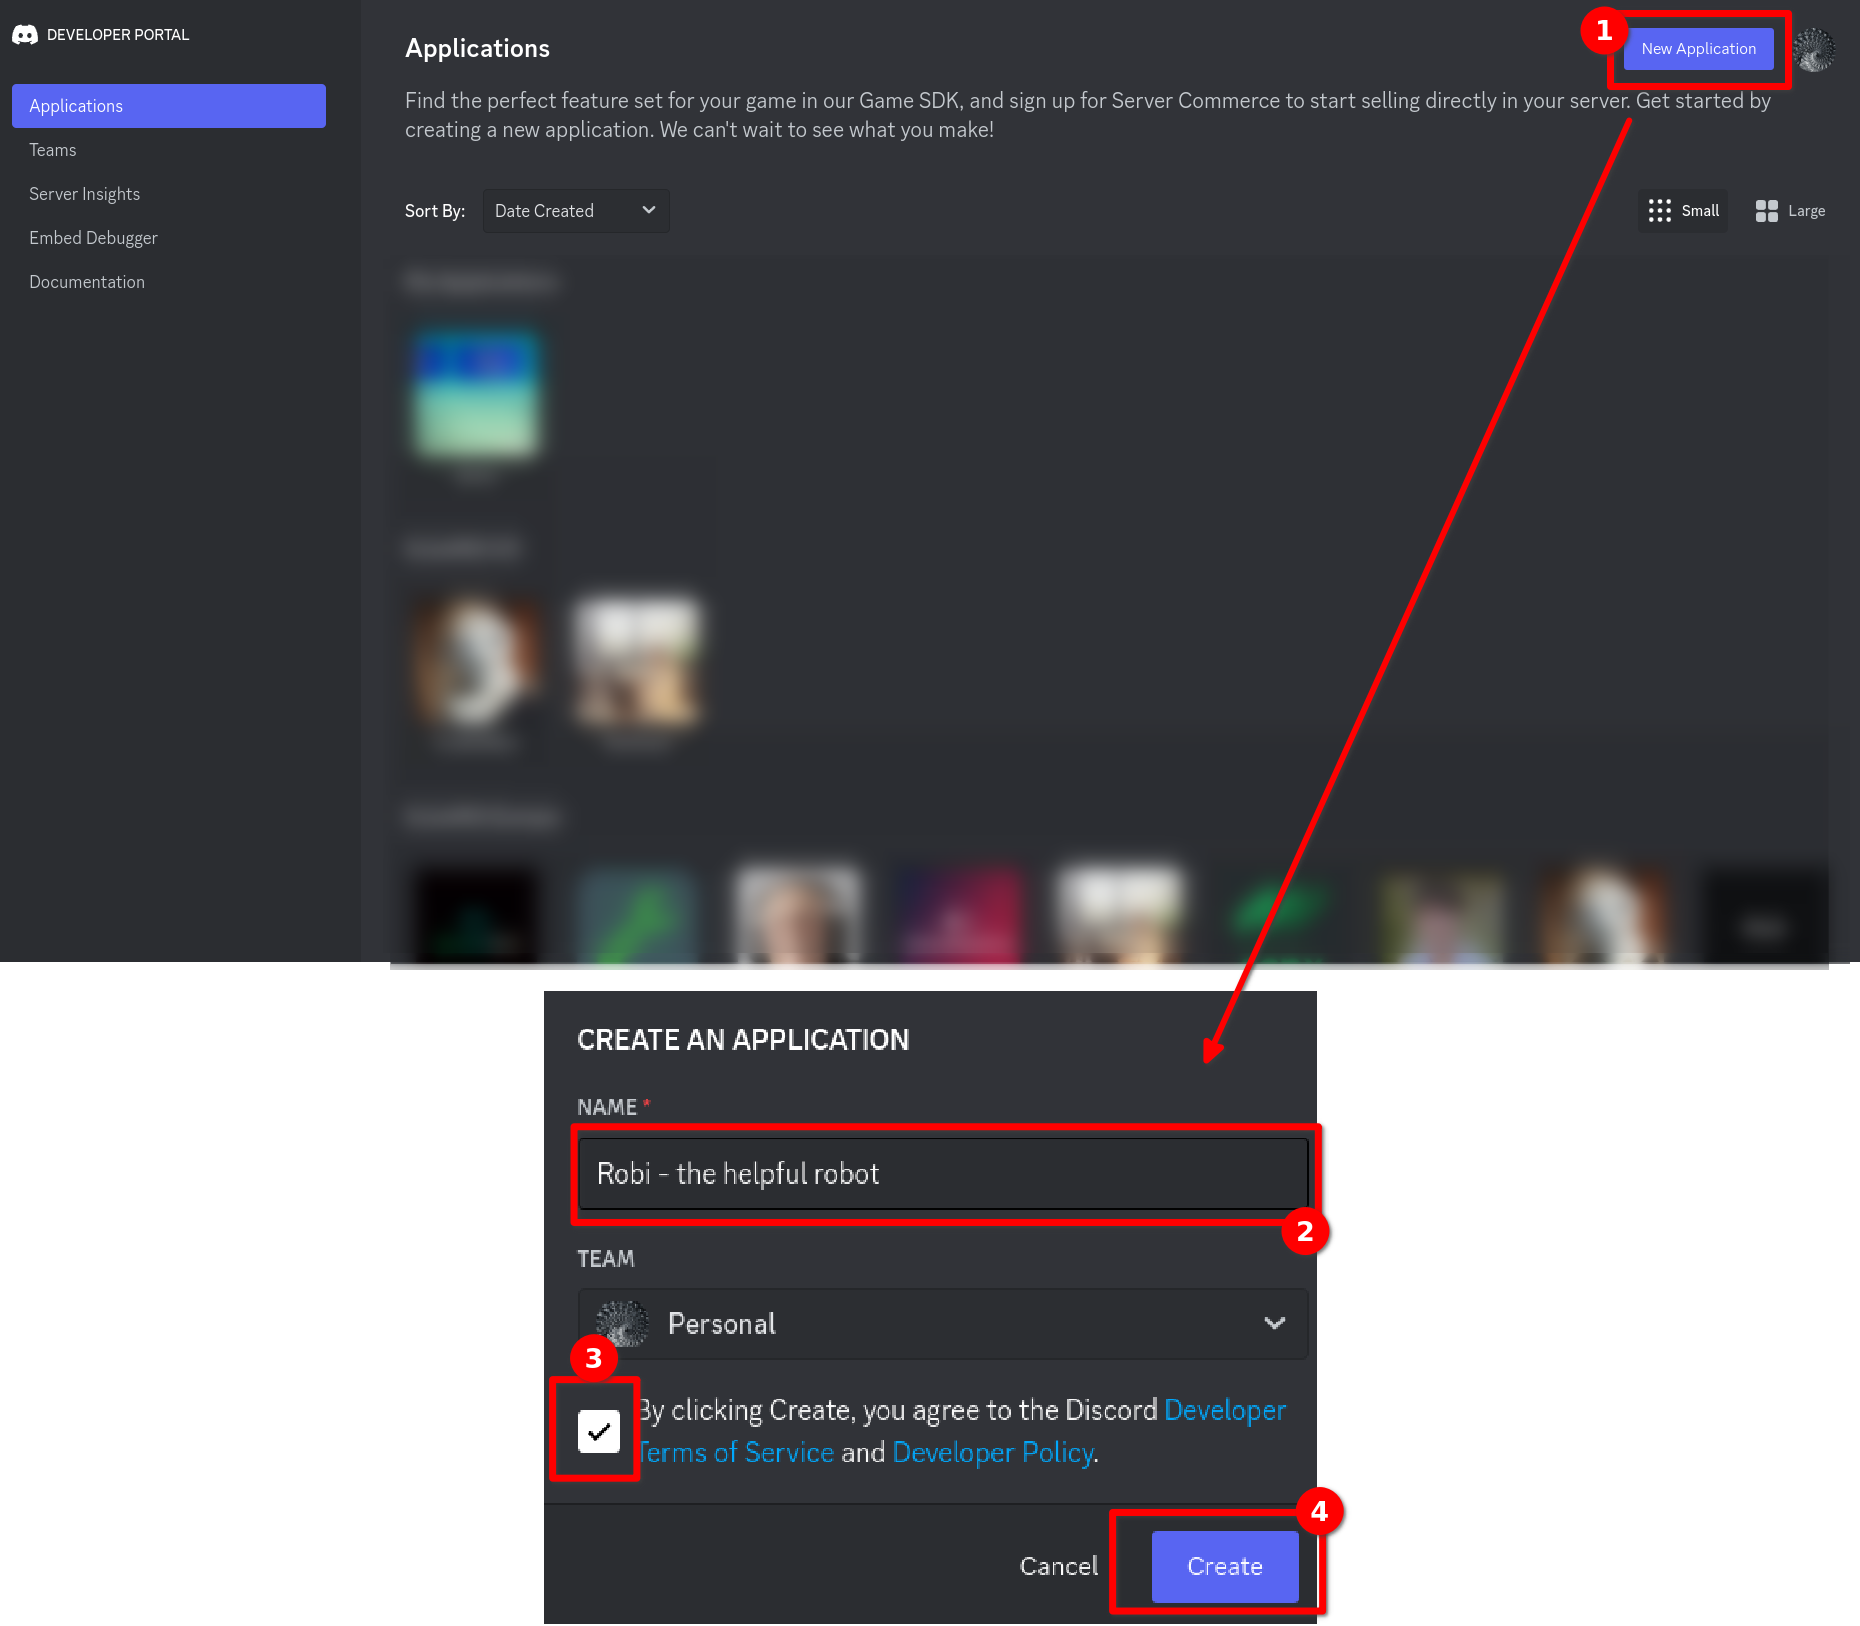
1. Create your Discord Application & Bot
Do not reuse an existing application. You'll need a new application for your Support Bot. SCNX does not support running the Support Bot and Custom-Bot or another third-party bot with the same token / application — please create a new one for each bot.
First, visit the Discord Developer Portal. There, create a new application by clicking on "New Application" on the upper-right side. Enter the name of the application (you can change this later), read & accept the Discord Developer Terms of Service and the Discord Developer Policy and confirm with "Create".
Next, open the "Bot" settings in the navigation bar on the left-hand side. Then click on "Reset token" and confirm your request in the modal. You might get asked to enter a 2FA code for your Discord account. Once done, copy the token of your bot — you'll need it in the next step.
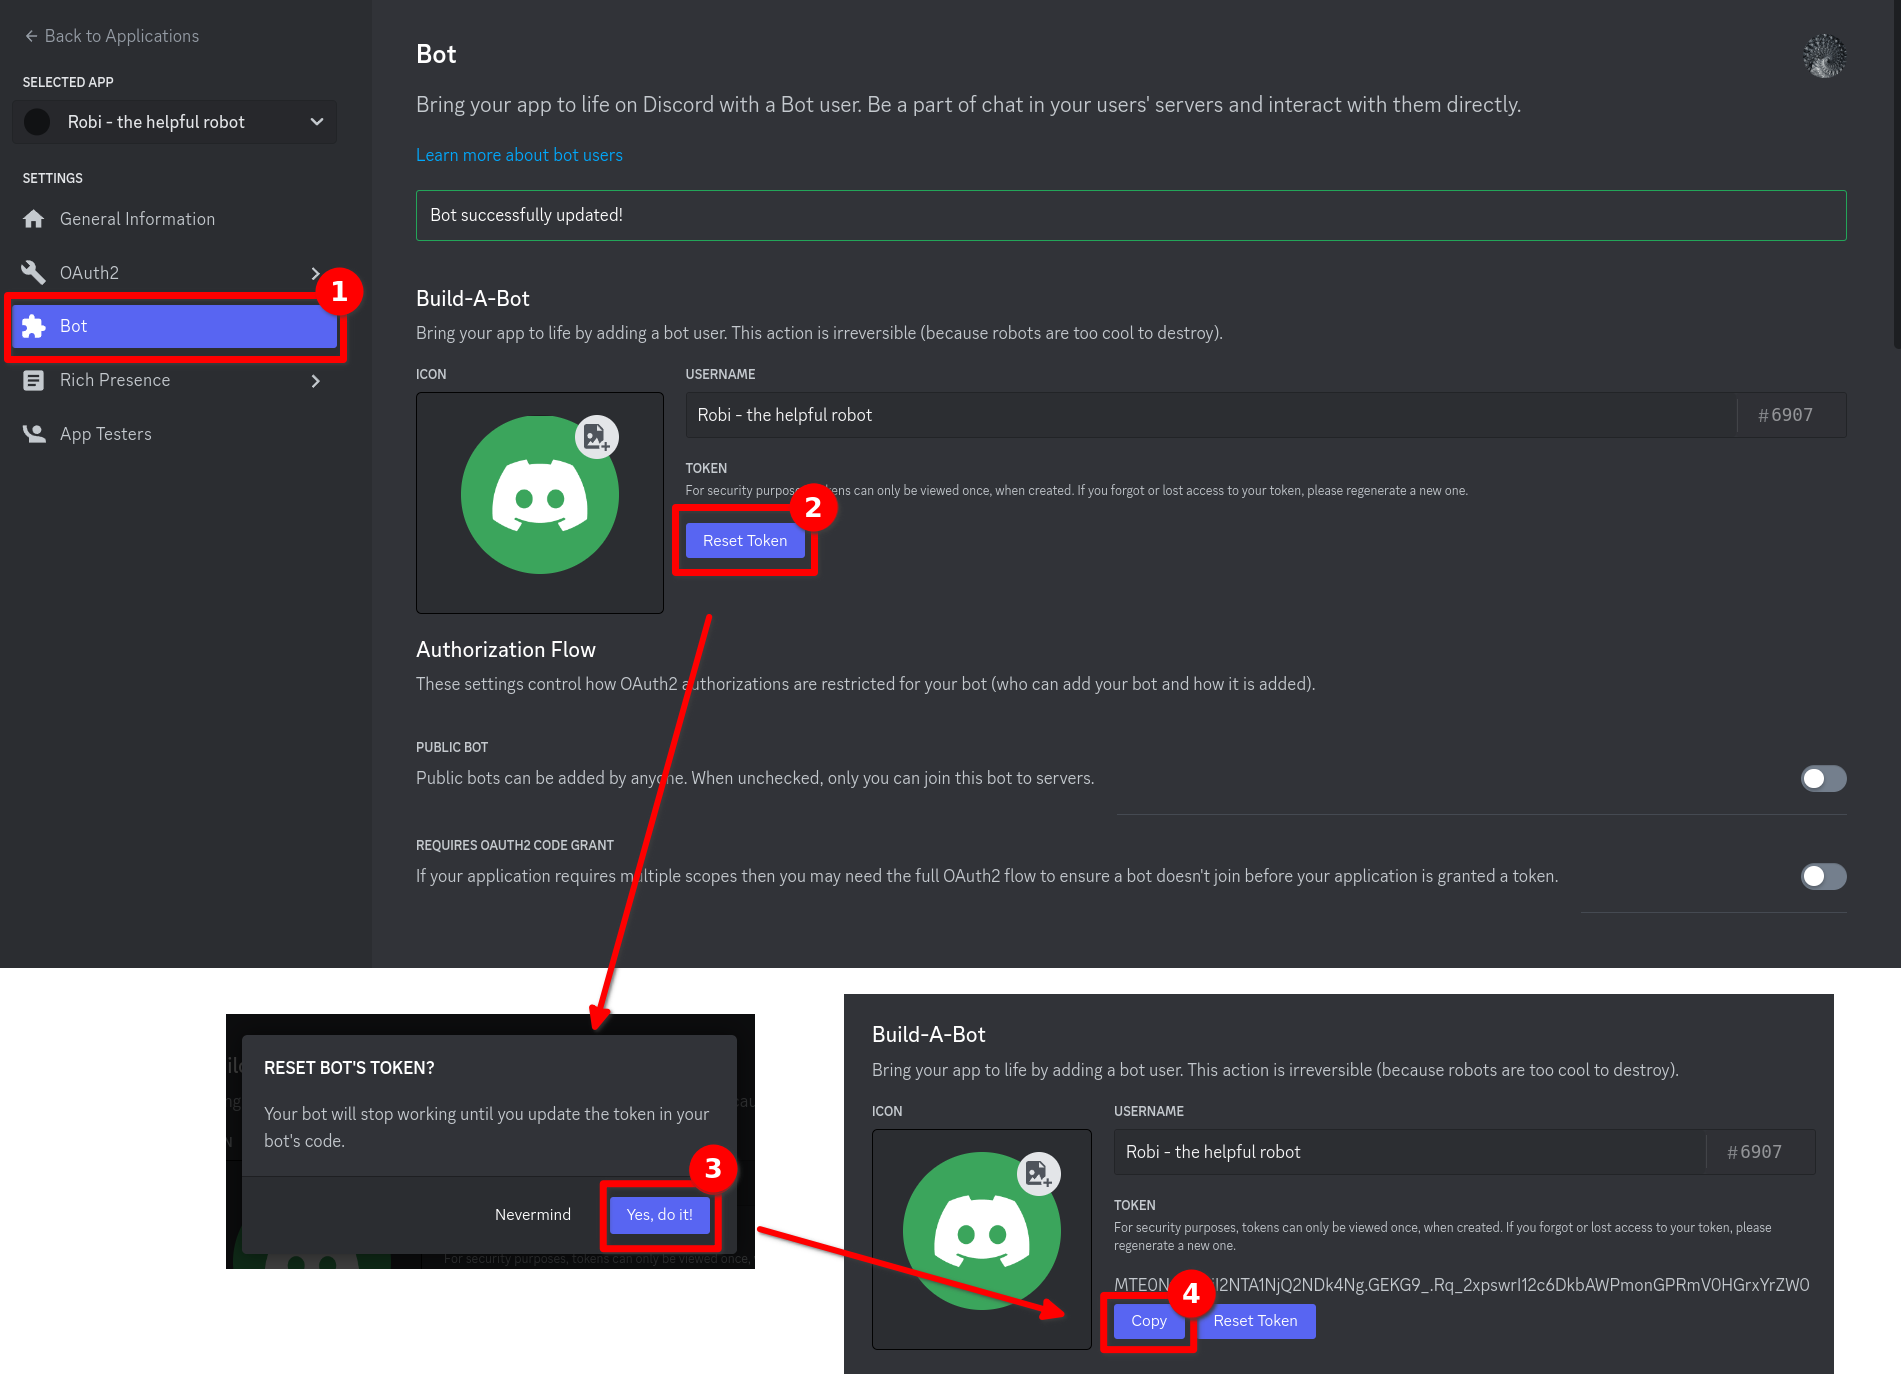
Only paste your token in the SCNX Dashboard. Never send a token to another user, trusted admins, or a member of our staff. Treat tokens like a password — users with access to your token are able to use your bot to perform harmful actions.
2. Set up the bot on SCNX
Open the Support Bot setup on your SCNX Dashboard. You'll be asked to enter the token you obtained in step 1. Paste it and click "Check my token & create bot". SCNX will verify your token and set up hosting — this might take a few seconds.
If you've already completed the setup, you can access the Support Bot dashboard instead.
3. Invite the bot to your server
Before you can configure anything, the bot needs to be on your server. Click the Invite Bot to Server button. This will open Discord's OAuth2 authorization screen — select your server, click "Continue", and then "Authorize".
Once the bot joins your server, the setup will detect it automatically and move to the next step. If the bot isn't detected, click Retry or Invite Bot again.
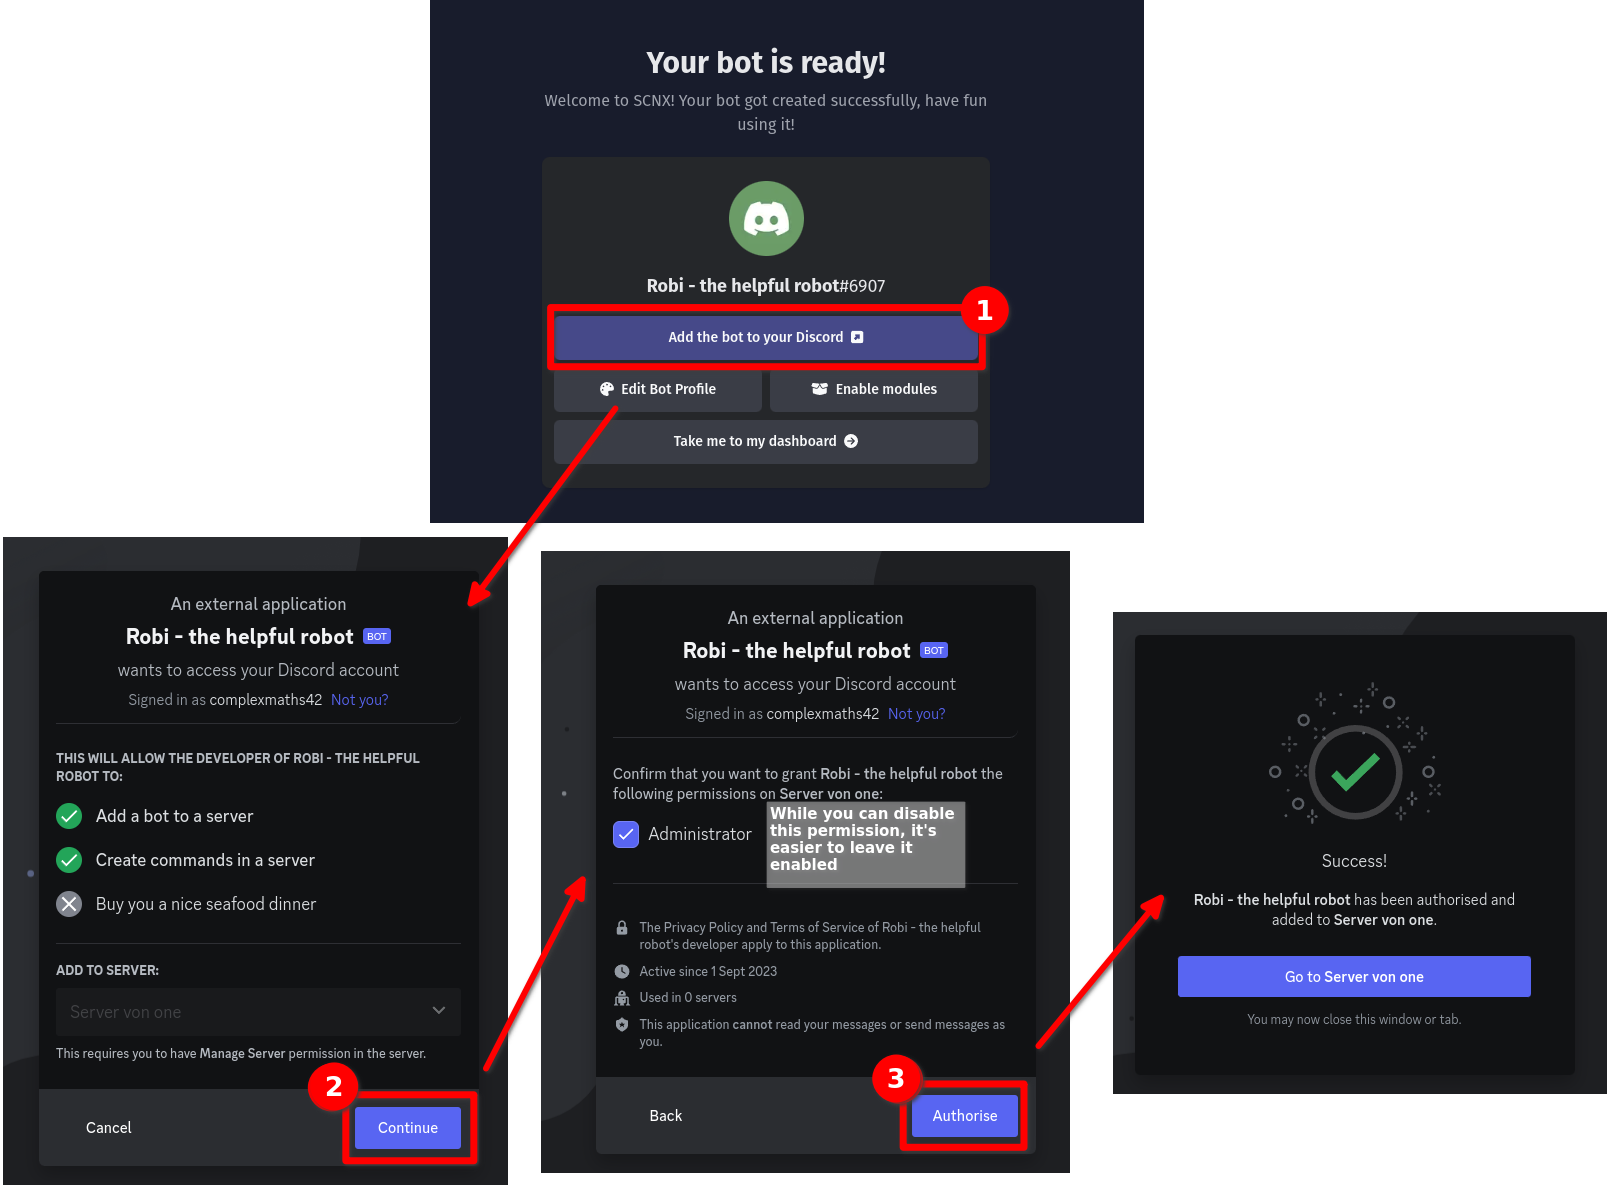
If you run into issues inviting the bot, make sure you have the "Manage Server" permission on your Discord server.
4. Choose your support mode
You'll be asked: "How would you like to support your community?". You can choose between two systems — or enable both:
| Modmail | Ticket System | |
|---|---|---|
| How it works | Users send a DM to your bot. Messages are relayed between the user's DMs and a private staff channel. | Users click a button in a channel to open a ticket. A new private channel is created for the conversation. |
| Best for | Personal, private support conversations | Structured support with multiple categories |
| Flow | User DMs Bot → Staff Channel Created → Messages Relayed → Staff Closes → Log Saved | User Clicks Button → Channel Created → Direct Conversation → Ticket Closed → Log Saved |
Select one or both modes, then click Continue.
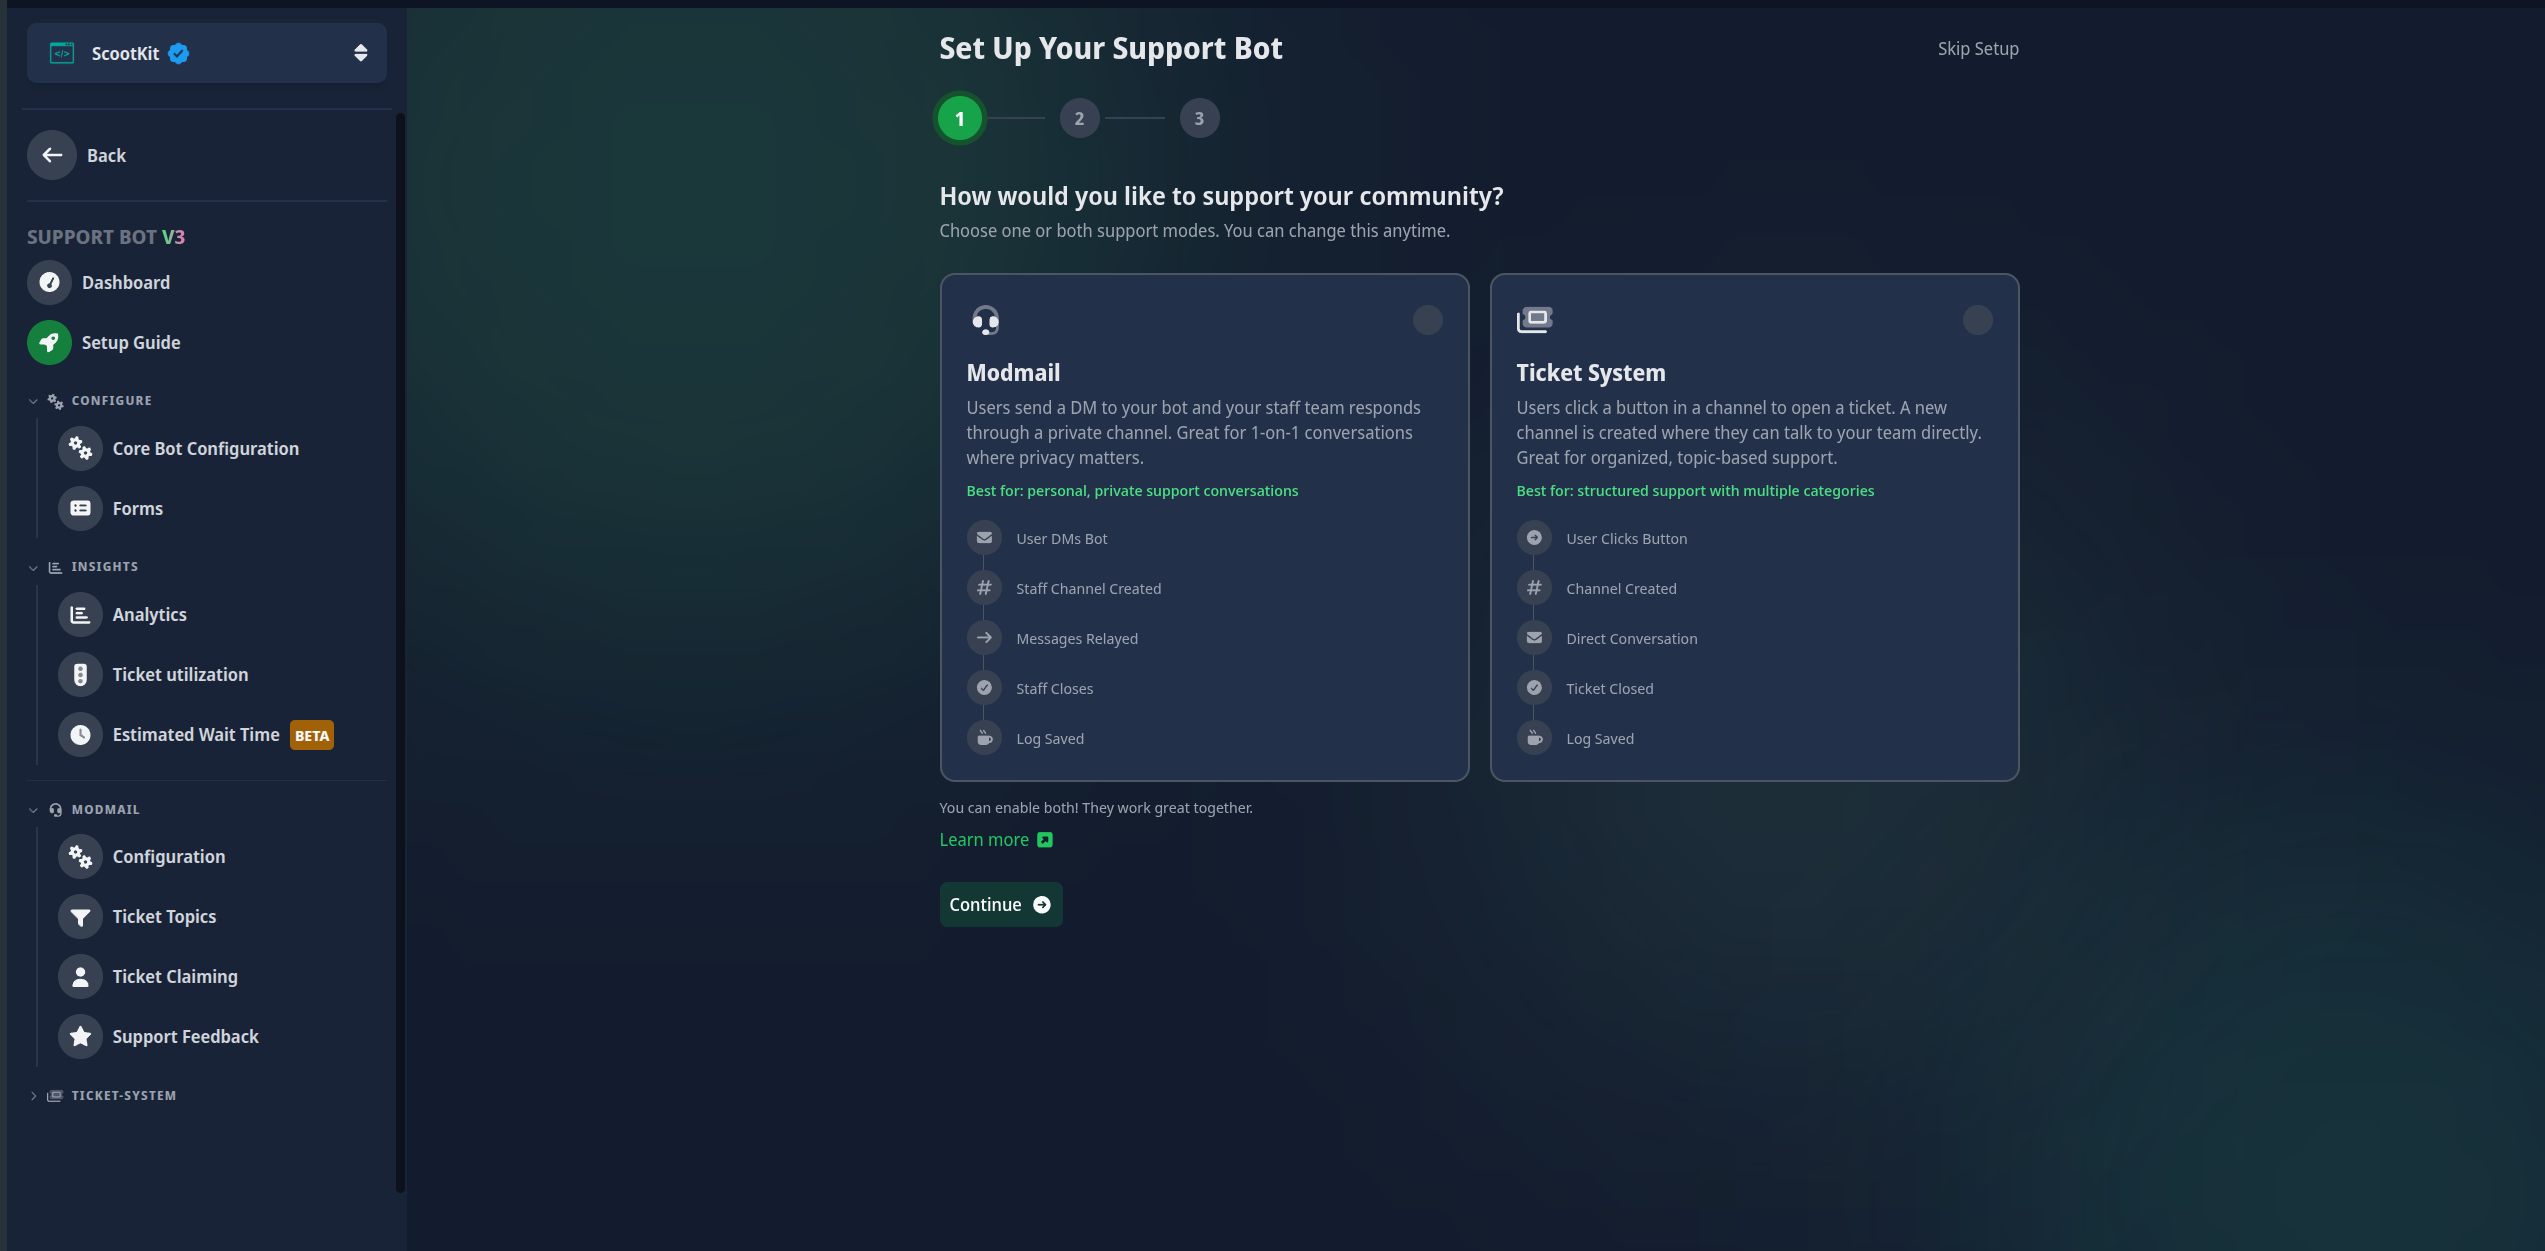
You can enable both systems — they work great together. Not sure which one to pick? Check the Feature Comparison.
5. Configure Modmail
This step only appears if you selected Modmail in the previous step. If you only selected the Ticket System, skip to step 6.
In this step, you'll configure the core Modmail settings. You can always change these later in the Modmail configuration.
- Ticket Category — select the category on your Discord server where new modmail ticket channels will be created. When a user DMs the bot, a new channel is created inside this category for your staff to respond.
- Log Channel — select the channel where closed ticket summaries will be sent. Every time a ticket is closed, a summary with the conversation will be posted here.
Info Message (optional)
You can optionally post an info message in a channel of your choice to let users know they can DM the bot for support. Toggle this on if you want the bot to automatically post a message like:
Need help? Send a direct message to this bot to open a support ticket. Our team will respond as soon as possible.
If enabled, you can configure:
- Channel — the channel where the info message will be posted.
- Message Content — customize the embed content to match your server's tone.
Click Save & Continue when you're done.
6. Configure the Ticket System
This step only appears if you selected Ticket System in step 4. If you only selected Modmail, skip to step 7.
In this step, you'll set up the channel-based ticket system. You can always change these later in the Ticket System configuration.
- Staff Roles — select the roles that should have access to manage tickets. Members with these roles will be able to see and respond to all ticket channels.
- Ticket Category — select the category where new ticket channels will be created. When a user opens a ticket, a private channel is created inside this category.
- Log Channel — select the channel where closed ticket summaries will be sent.
Ticket Open Message (required)
The ticket system requires a message with a button so that users can open tickets. You need to configure:
- Channel — the channel where the "Open Ticket" button will be posted. This is typically a support or help channel visible to all members.
- Button Label — the text on the button (default: "Open Ticket").
- Message Content — customize the embed message displayed above the button. The default message is:
Need Support? Click the button below to open a support ticket. Our team will get back to you as soon as possible.
Click Save & Continue when you're done.
You must configure at least one open message channel for the ticket system to work. The setup will highlight this field if it's missing.
7. Advanced features (optional)
The next screen asks: "Want to take it further?". Here you can optionally set up advanced features to enhance your support experience. You can configure any of these now or come back to them later from the dashboard.
| Feature | Description | Learn more |
|---|---|---|
| Ticket Topics | Categorize tickets by topic for better organization and routing. | Modmail Topics · Ticket System Topics |
| Claiming | Let team members claim tickets to prevent duplicate work. | Modmail Claiming · Ticket System Claiming |
| Support Feedback | Collect star ratings and feedback after tickets are closed. | Modmail Feedback · Ticket System Feedback |
| Forms | Collect structured information from users when they open a ticket. | Forms |
| Opening Hours | Set when your support team is available, including holidays. | Opening Hours |
| Bot Branding | Customize your bot's footer text and appearance. | Bot Configuration |
Click Set up on any feature to configure it, or click Continue to skip and finish the setup.
Features you've already configured will show an "Already configured" badge. You can always change these settings later from the dashboard.
8. You're all set!
Once you've completed the setup, you'll see a confirmation screen showing everything you've configured. Click Go to Dashboard to open your Support Bot management page.
Here are a few things you can do next:
- Share the Modmail Starter Guide or Ticket System 101 with your team.
- Set up ticket topics to organize incoming tickets.
- Enable forms to collect structured information from users.
- Configure opening hours so users know when your team is available.
- Check out the analytics dashboard to track your team's performance.
- Explore all options in the Support Bot documentation.
We have a troubleshooting guide ready for you. If that didn't help, we're always happy to assist — just visit scnx.app/help.